Showing posts with label sewing. Show all posts

Monday, April 18, 2011

Solar Dresses for Sunny Days

It's been awhile. Sorry about that. Life gets all whirl-windy and somethings just get pushed back.

I haven't sewn since before we moved. In December. Yep, it's been that long since I've pinned and cut and measured. I've missed it.

I decided this week will be my sewing week. I have a nearly eight year old that is getting too tall for her summer clothes and the budget is too broke for store bought goodies. I like them in knee-length or lower, little girls like to forget they're wearing dresses when it's playtime. I brought out all the fabric I've had boxed away since the holidays. Thanks to a free tutorial from Vegbee, Solar Dress, my girls are now the super proud owners of some light and airy summer dresses complete with pockets.

Please excuse the lack of iron. I can't find it.

When did she get so big??

I swear I didn't photoshop this. That fabric is just this bright.

It's a great dress for dancing.

And for jumping.

And playing.

Once I got down the instructions with Olivia's dress (the blue), it took me much less time to crank out the other two. It's a very simple pattern and free. Which makes sunny summer days totally cool.

Wednesday, October 20, 2010

Halloween Apron Tutorial-ish

It was brought to my attention that by the time I got the girl's costumes finished it would be too late to share the pattern because it would more than likely already be Halloween by then. Yes, I've been procrastinating making the costumes.

Please excuse the crummy photos but here is the general gist of the girls costumes. These are very versatile aprons I've designed based on one we found at a thrift store eons ago. I'm putting a very basic peasant shift under each which will later be used as jammies or decorated for regular wear dresses. The aprons are small enough to not take up much room after the holiday and the materials are inexpensive.


 I took each girls measurements and drew out the pattern. The front panel is cut 4 times (fold in half and cut on the fold for the chest piece). I added 1/4" seam allowance to each side of each measurement.

Sew together at the shoulders and iron open to creat a rectangle with a rectangle in the center with raw edges all round the outside. Pin right sides together and top stitch along the inner rectangle. Turn right side out and iron flat. Iron a 1/4" hem along the outer sides leaving the bodice bottom open.


The bottom apron is cut approx 5" wider than the top and I hand pleated it to make a "skirt" Sew the skirt right sides together to the back and front of the waist pieces on the bodice. The ties are 3" by 25" made into a double fold bias that was sewn on top of the seam of the top and skirt.


I used a scrap piece of white and navy blue bias tape (because that's what I had on hand) to creat the little crossed bodice on the front of Emmy's. She's Little Red Riding Hood. Her peasant underdress will be white and I will be making a red fleece hooded capelet for her.


Olivia is going to be Alice in Wonderland. I used very inexpensive white muslin for her apron. I sandwhiched some ruffled edging along the outer sides of the bodice. Her underdress will be light blue.

Cordelia is going as Dorothy from Oz. Her apron will be blue checked like Emmy's but without the front detail, she'll have a white underdress too. She's the only one that got anything additional in the form of red sparkly shoes. But again, she can reuse those after the festivities are over.

If you have any questions I'll be happy to answer, I know written directions can be a little vague but I just don't have the time to do a full blow tutorial right now! Hopefully you understand.

Saturday, September 11, 2010

Frogger + Pacman + Japan + Toiletries = Awesome.

I stumbled upon this tutorial while searching for a link to send a friend. Instantly, I knew I had to make this bag. I'm going away for my birthday weekend next week and am lacking in the awesome toiletry bag department. Actually, I have no toiletry bag at all, so this was a welcomed project.

The whole thing whipped up in about an hour. Though your time might be significantly less if you're not pausing to wipe yogurt out of someone's hair, changing dirty diapers or chasing children around the house trying to retrieve forks, permanent markers and other random hazards. Even with those distractions, I still ended up with a rockin' bag.


The instructions are straight forward, lots of photos and free. What's not to love? I will say this is fairly small. If you carry a small department store's cosmetics counter with you, you'll need to make a larger bag. I'm not judging, just forewarning. Fortunately, for me, my toiletry needs are simple and sparse; shampoo, spare contacts, toothbrush and deodorant. Easy peasy. And, dare I say, Japaneesy.


I got this fabric as a freebie when I ordered my last shipment of Japanese Lego fabric. It's imported from Japan, is a medium weight cotton canvas and just about the coolest thing ever. How can you not be drawn to the Frogger-Pacman-esque theme? The myriad of dots, stripes, Japanese words I have no idea how to read, and zigzags call out to the primal Eighties era crafter in me. Until now, it had sit in my stash being neglected. I just couldn't figure out what to make with it.


The inside is lined with a scrap piece of orange dots. The zipper was actually an 18" I cut to size and the tabs on the sides are grosgrain ribbon because I didn't feel like making them. I already have plans on making another for sewing stuff.

I love this bag.

Saturday, September 4, 2010

Gifts for a Girl

I've been keeping this project secret for four days now. I can barely contain myself. I'm actually writing this blog post earlier than I'll post it because I still want it to be secret. After lunch, we're headed to a little girl's birthday party. I've known this little one since she was still gestating in her mama's belly.


I used the pattern in the book One-Yard Wonders. The book is great for fairly simple projects with limited resources.  Unfortunately, the project I picked -the Fabric Dollhouse- wasn't at all simple.


I like to pride myself that I can figure out how to do stuff with minimal directions but this house nearly drove me insane. Though now that I know how to do it, it's actually quite simple.


The hardest part was the lack of measurements and the discrepancy between the house they show you they made and the instructions they provide. Their house has a roof and a garden. The directions have you making a house that's all the same color interior/exterior.


Everything for this I had on hand which is pretty amazing. I even stole photos off the mom's facebook page and printed them on inkjet compatible fabric.


And of course, true to my nature, I didn't add the proper number of button closures and didn't put enough batting in the thing so it's a little delapidated. Things I have learned over the past four days. 1. Don't start a handmade present that requires this much work without at least a weeks notice.  


2. Directions are for suckers.


3. I suck at hand sewing.


4. Don't make fun new projects infront of the same age/gender children you're not giving anything to.
My girls won't stop asking for one now.

I used lots of buttons for embelishments; the rose shaped ones for the rose bushes outside, the flowers in the garden, the door knob on the front door. The rest is pieces cut from wool felt and hand stitched with embroidery floss. The doll is one of my Bestest Friends that I handpainted. There is another girl but she wasn't done "getting dressed".


I hope she likes it.

Friday, August 27, 2010

Building a Better Bonnet

I revised the bonnet pattern yesterday. I'm quite pleased though it needs a little tweaking.


According to the kids, the back needs to be "bouncier". Oh, those Prairie Girls and their bouncy backed bonnets.


The brim is near perfect but "the stringers are too big". Which translates from three year old to the ties are too long. Today that will be rectified.


It resembles a newsboy a bit. I blame the lack of bouncy back part and using too long a piece of elastic on the neck line. Perhaps even narrowing that back part considerably might be in order. It literally took me about twenty minutes to draw the pattern and construct the thing. And I didn't get mad or confused once.  I even made different sizes. 


"Mommy, we read Liddle House on the Querry now?" Emmy asks. "I have my bommet on."


This is why I sew.

Thursday, August 26, 2010

There's been a discrepancy here

In our quest for All Things Prairie, the girls have requested sunbonnets. Bonnets? Sure, why not. I can make a bonnet. Because of my laziness busy-ness, I decided not to try and recreate the wheel by making my own pattern and just go out and buy one. I ditched the bow on the back and the extra neck protector piece the pattern calls for. I looked at the way Olivia's bonnet we purchased from Cracker Country at the fair earlier this year. I prefer her hand folds to McCall's required gathering. The pattern is sized for girls ages 7-10 years. Olivia is 7, her bonnet fits her so I thought that would be what I'd get; a bonnet fit for a little girl. What I got was completely different...


That's me under the monstrosity, if you can't tell.

Really, McCalls? This is sized for a child? There has been a huge discrepancy in pattern sizing which is one reason I just ditched fifty uncut patterns at the thirft store. It's frustrating for a fairly experienced sewer, I can't imagine what a novice must encounter. This hat is huge. Really, it's sizes too large for my larger than average sized head. I know I have a big head because hats. never. fit. The fact I found one good hat doesn't give way to illusions that my head is in any way, shape or form an average hat-wearing sized head.

The instructions alone are confusing and convoluted. There is even a step sewing a piece they never told me to cut out. Why sew the ties together and then curse every inch of the tubing by pulling it right side out? Why not just make them large enough to make a bias and save so many perfectly sane women from frustrated and foul tempers? Why not include finished dimensions on the friggin pattern so we can decide for ourselves what would make a ridiculous sized bonnet for our kids with normal sized heads? By my calculations, I'd have to buy the bonnet pattern for sizes 6-12 months to get a hat the right size for my five year old. Now, I'm stuck with a gigantic bonnet, wasted yards of fabric, two disappointed children and the new task of just making the stupid pattern myself which I should have done in the first place.

McCall's should be ashamed of themselves. Deluding sewers by falsely sizing patterns fit for giants. Deluding little girls intent on imagining themselves as Laura or Mary by creating ununiform patterns that won't ever, ever fit their heads. Even if they do end up with fairly large ones.

Friday, July 30, 2010

Sewing with Kids

Sewing is a passion of mine. I love perusing stores, ogling beautiful fabric and imagining fantastic creations coming to life under the foot of my machine. I love making things for pennies what costs dollars in the stores. My kids watch me sew. Much of what I make is for them so they have a vested interest in my creations.

But they don't like to sit idly by while I get to play with all the cool fabrics and gadgets. They want to create, too. We've done one sewing lesson a few months back which was a huge success. The pillows are still in use. They ask me continuously when we're going to have another lesson but time just hasn't allowed for it.

When we went to the fair earlier in the year, the kids each won a fairly large stuffed toy. I hate these things. They're made of scratchy, cheap fabric filled with those little styrafoam balls. They take up about 6 square feet of my tiny house and make a terrible crunching sound when they're hugged. It makes my skin crawl like nails on a chalkboard.

So, when they ripped I left them on my sewing desk. I gave the kids excuses about how busy I am and how it prevents me from fixing these holes in their beloved toys. I had hopes that I could secretly toss them out when they weren't paying attention and they'd never realize it. Yes, sometimes I employ subterfuge. Unfortunately, I was thwarted. They incessantly asked me when I'd get to fixing their toys so they could resume loving them to tiny pieces. I finally got sick of it today.

I made up a little sewing kit for the kids that I had intended to introduce them to when they were "old enough". But with our new ideas of unschooling, their requests for repair turned into teaching.


I've found that telling a child they cannot touch something because it is dangerous only fuels curiosity. Not to say that certain dangers shouldn't be avoided but sometimes education when they are interested helps build respect. I've found this true with sewing. Telling my three and five year olds "NO!" that pins will hurt and poke them has tiny fingers itching to grasp those shiny little pearls that stick out of my stuffed pumpkin. Showing them what they are used for, giving them the opportunity to use them curbs desires and forms respect. Pins are tools, not toys.


We discussed the parts of a needle, how fabric was woven and the importance of working to fix things we own instead of wastefully discarding them.


They learned how thread and needle come together to mend and create.


They worked for what they wanted instead of pushing it off on me.


They grew in confidence while they concentrated.


And were delighted that their hands made results that impacted their own lives.


Cordelia's fair toy didn't have a seam to mend so I introduced her to a stitch ripper. She was so proud when she finished as she was aiding me with my projects. And I was proud of each of them.

Sometimes, I forget how talented and "old enough" my kids are. Sometimes, the easier way of doing it myself or not doing it at all takes away the opportunity to involve the kids in our whole lives.

Monday, July 26, 2010

It's here!

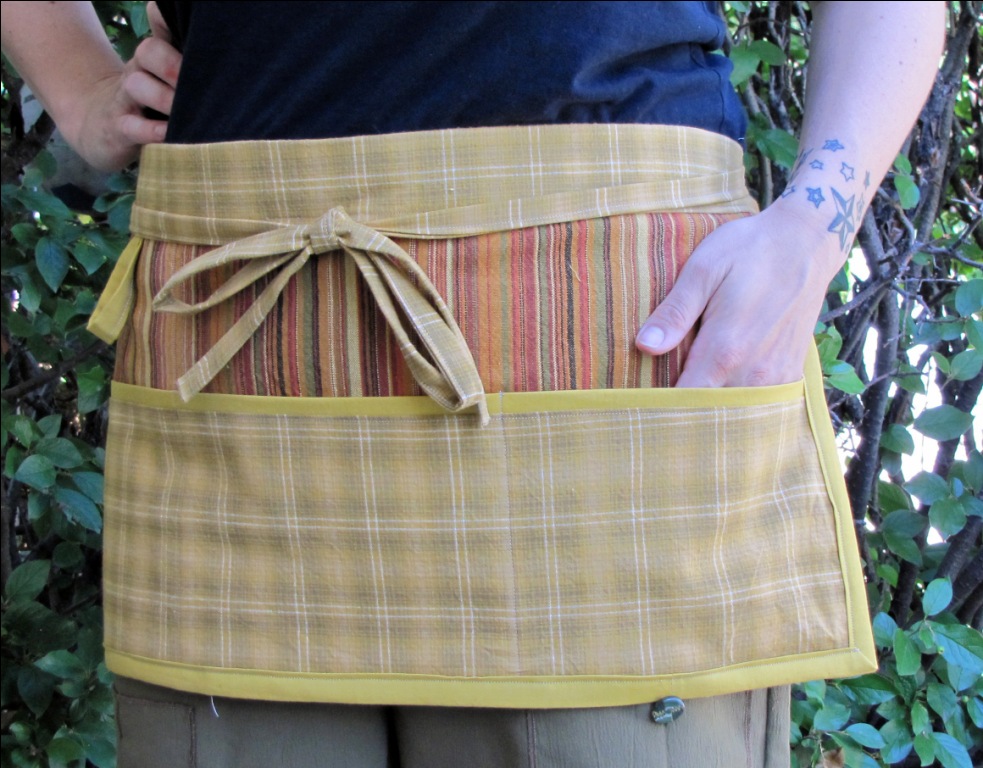
The Monroe Market 3-Pocket Vendor/Utility Apron is finished and up for sale!


And a very special THANK YOU! to my apron pattern testers. Thank you for your patience and your wonderful advice.


I'm pretty proud of my pattern coming to life like this. I'm also working on a Monroe Market Helper pattern. I'll let you guess who those will be for :)

Friday, July 9, 2010

Another quilt finished!

 had been requisitioned by the hubby to make a quilt for his co-workers new baby. It's their first and a boy! I got the request a few weeks before the baby was due and just now finished it, a few weeks after he was born. Oh well, better late than never right?


I did this in an assortment of red, blacks and whites. I love the way it came together. I used a Kona white for the alternating patwork solid.


And a meandering quilting through the three layers; top, natural cotton batting and back. The back is made with a black, white and red print from IKEA.


I hope the little monkey likes it.


Sunday, July 4, 2010

Happenings

We visited the land yesterday and you can read about it here. Today, I finished up what is now known as the Monroe Market Apron pattern and am sending it out to those that volunteered to test it. Hopefully, in a month or so, the aprons will be made up and the pattern finalized for sale. It feels good to have something near completion that will help us fund the farm. Visiting the land yesterday really made me ponder our life out there. I want to go up badly. Tiny whispers floated in my mind encouraging me to just shuck everything and do it. Make the move. But we can't just yet. We are laying small stepping stones to get us there though.


Monday, I have a big field trip planned and exciting things are in the works. I don't want to blab about it now just incase things don't work out but look for a post on it soon!

Friday, July 2, 2010

It's finished.

I blew the goal of having this done by Livi's birthday this past Tuesday but I exceeded my expectations by having this done less than a week belated.

Last night I finished the last stitching the last of the binding on Olivia's birthday quilt. This is the largest one I've ever done measuring just a bit shorter than a twin size. (Because I just winged it and should have MEASURED how big it needed to be.)


I messed up on this quilt. A lot. It's an alternating 9-patch and I used a new method of quilting I hadn't tired before called "quilt as you go". The method wasn't hard at all but I had the brilliant idea of sewing 1/4" away from each seam instead of quilting the whole thing, and then doing the same on the seams where the pieces were joined including the backing. My machine doesn't have a long enough arm for this. It ended in me swearing a lot and shoving the fabric through. The results could be better. Maybe I'll fix it if I ever get a new machine.


The border is the same stripey fabric that appears regularly in the quilt. And the back is a full size white sheet I picked up at IKEA for $7 and hand dyed bright orange. Here is another place I had a learning experience. The dye didn't take fully in my very-large-for-canning-very-small-for-dying-fabric stock pot. So I had to redo it in the galvanized tub we use to wash the dog. Still the price of the dyes and fabric came to less than $15. There are still some lighter spots on it. ::Sigh::


Being the largest and most difficult quilt I've ever made and even with all the imperfections Olivia and her tribe are still pleased as punch with the results. Which is all I can ask for, really.


Tuesday, June 29, 2010

Pattern Testers Wanted

I'm tired of moping about not having money. I'm tired of complaining that we'll never get our land developed. So, I'm doing something about it. Not sure how well it will work but I'm trying and I think that counts for a lot.

I'm working out a pattern for a utility/vendor apron I made and need two people (at least) to test the pattern and tell me if my instructions are completely wonkers.


I've been told this would be great for teachers, waitresses, farmer's market people, gardening, home improvement, home party throwers, evangelists, anywhere you need extra pockets to hold stuff you need. I use mine for clothes pins while I stylishly hang laundry in the back yard where no one sees me. Hey, I see me and my bright apron makes me happy. Plus, the kids know when the apron goes on we have laundry to tend.


The pattern would be free, emailed to the first testers that volunteer and in PDF format. It's intermediate skill level mainly because of the enormous amount of bias tape that needs to be made and blindly sewn. When I get the a-okay that the instructions are clean, clear and easy to follow I'll have the pattern up for sale in our Etsy shop.

Monday, June 14, 2010

Prefold cloth diaper to semi-fitted - Tutorial

We use prefold diapers and covers over at our house. I find that I like them a lot better than any other cloth diaper both for use and cost. I've mastered quite a few folding techniques and the covers do a good job keeping the cotton in, but with a boy, getting that just-right-fit is difficult.

Especially, if they're like Max and like to "help" you put the diaper on by taking it off or try and run away all together.

I've been working on this for a little bit, the nice thing is that it doesn't have to be perfect since no one will really see it and if they do, chances are they're poo-stained anyway. Who's going to look closely at sewing lines at that point?

Take your flat diaper, I use unbleached indian cotton, and lay it flat. Measure out approx 5" on one side and 3.5" on the other. The five inches will be the "back" and the 3.5 the "front" when you put the diaper on. Mark these places and draw a semi-circle connecting them like this:


Sew a tack stitch along the line you made. Cut off the semi-circles along the sitch line without cutting the stitches.

Cut off the stitching along one end and "open" the diaper so the outside is now inside ripping the inside seams apart. You might have to work the folds of the middle section a bit. Sew it all the way around the edges and then turn it back right side out.


You may have to sew down the side where the fold of the diaper meets. Sew a top stitch around the whole diaper and on the end you opened sew it closed with a tight zig zag.
Less leg bulk all the absorbtion!